My rants about my many issues with Mac OS shouldn’t be news to those of you that follow me on social media. I’ve cursed the operating system to the high heavens on several occasions oblivious to the fact that one of my geek moves was the cause of my woes. In my defense, some of my problems came up in the Apple forums so there was no way I could tell that my geek actions were to blame
The last 48 hours haven’t been easy at all but have most definitely been fun as I decided to take advantage of the ongoing strike action to reformat and reinstall Mac OS Mavericks so as to see if all the issues I was having with my Retina display Macbook Pro would end instantly.
In summary, Spotlight now works, so does Mozilla Firefox. The App store no longer freezes on me, Progressive Downloader is breezy and the dreaded white screen of death I get most of the times when I shut down my Macbook is GONE.
The question on your mind now is probably what did I do to trigger all this mess. Well, partitioning my hard drive and moving the Mac OS home folder to the new partition seems to have been the cause of my woes. Right now, I’ve decided to leave the partitioning business to Windows folks and just develop the habit of backing up my data religiously from time to time. I’ll be taking delivery of my 2TB external portable Western Digital hard drive next month and I’ll be creating a 512GB partition on it solely for my Mac OS/Bootcamp backups.
I’m really grateful to Etisalat Nigeria for their PayG by Pulse data plan without which it would have been next to impossible to achieve this whole reinstallation with minimal expenses. I spent just N2,200 and downloaded over 12GB worth of data throughout the whole process.
It’s common knowledge that Apple for some stupid reason doesn’t ship their Mac PCs with a recovery disk or offline recovery partition. Each time you wish to reinstall your OS, you have to download the whole 5.32GB installation file off their servers. Unknown to most folks out there, there is a legal way of creating a recovery flash drive for yourself and that’s what I’ll be sharing with you below thanks to some fantastic guides I followed.
How To Create A Mac OS Recovery Flash Drive
WARNING: As always do please back up your data before you proceed should in case something goes wrong. Also endeavor to read the entire article to the end as well as watching the videos included before you attempt this. Thank you.
You’ll be needing an 8GB USB flash drive preferably the USB 3.0 type as they are much faster (They come cheap for as low as $5 from Amazon). I don’t know if a higher capacity flash drive will work as well. You might want to get two flash drives though if you plan on installing Bootcamp as well. This way you have recovery disks for Bootcamp and Mac OS.
Launch the App store and search for Mavericks. If like me you have it installed on your PC already, it will show a pop-up like the one that appears in the screen shot below. Simply click on Continue and the 5.32GB download will commence. You can monitor the progress of the download via the Launchpad.
Click to enlarge screenshots for a better view

Once the download is complete, the installation screen for mavericks will pop up. Shut it down.

Insert your 8GB USB Flash drive and go to Disk Utility. Select your drive and go to the Erase tab. Select Mac OS Extended Journaled as the format and leave the name as Untitled. DO NOT CHANGE THE NAME OF THE FLASH DRIVE. Leave as shown in the screenshot. Click on Erase and wait for it to complete.

Once complete, launch Terminal and paste in the code below and hit enter
sudo /Applications/Install\ OS\ X\ Mavericks.app/Contents/Resources/createinstallmedia –volume /Volumes/Untitled –applicationpath /Applications/Install\ OS\ X\ Mavericks.app –nointeraction
NOTE: For creating Mac OS X Yosemite installation usb flash drive, use the command below
sudo /Applications/Install\ OS\ X\ Yosemite.app/Contents/Resources/createinstallmedia –volume /Volumes/Untitled –applicationpath /Applications/Install\ OS\ X\ Yosemite.app –nointeraction
NOTE: For creating MacOS Sierra installation usb flash drive, use the command below
sudo /Applications/Install\ macOS\ Sierra.app/Contents/Resources/createinstallmedia –volume /Volumes/Untitled –applicationpath /Applications/Install\ macOS\ Sierra.app –nointeraction
NOTE: For creating MacOS High Sierra installation usb flash drive, use the command below
sudo /Applications/Install\ macOS\ High\ Sierra.app/Contents/Resources/createinstallmedia –volume /Volumes/Untitled –applicationpath /Applications/Install\ macOS\ High\ Sierra.app –nointeraction
Enter your password and the system will begin to burn the recently downloaded Mac OS to your flash drive. Once this is done, remove your flash drive and store in a safe place.

If you wish to proceed and reinstall Mac OS, do please do a final Time Machine backup of your system so you can restore your applications afterwards using the Migration Assistant.
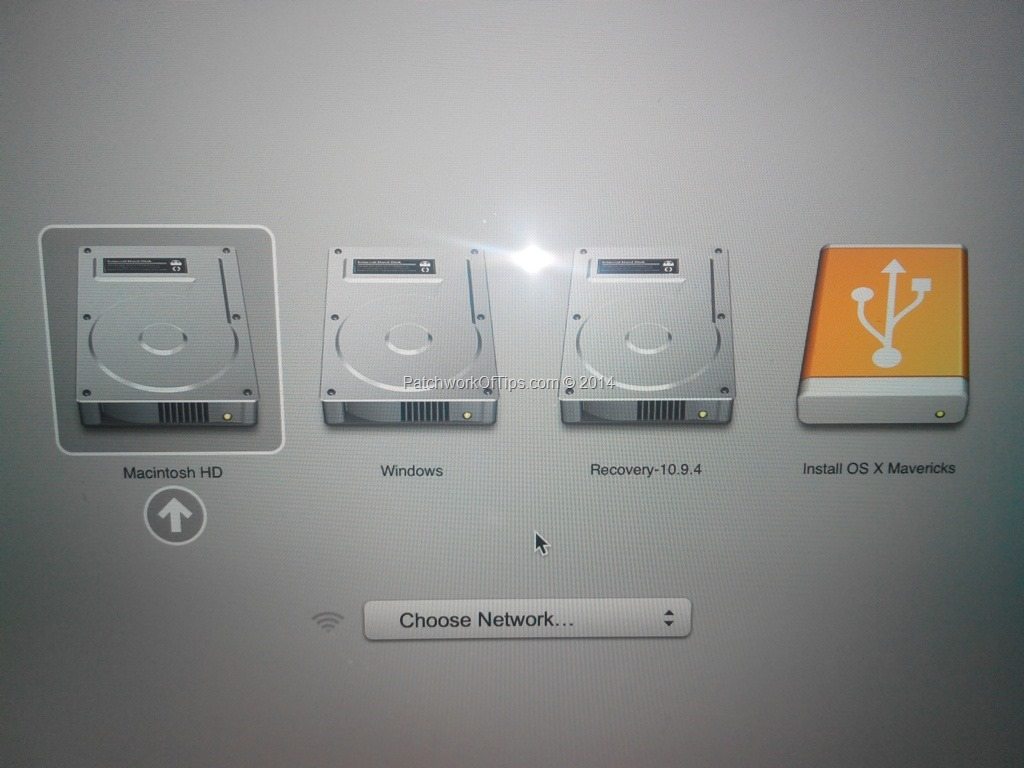
Shut down your Macbook and plug in the recovery flash drive. Hold down the option key and start your computer. Don’t let go until you’re in the boot selection screen. Select Install OS X Mavericks
You will need to completely format and clear all partitions on your hard drive before proceeding with the installation. Please check out this YouTube video from the 11th minute.
The re-installation process could take up to 30 minutes. Once it’s done, during initial setup Migration Assistant will popup. Connect your Time Machine backup drive and restore your applications only. I don’t recommend restoring other settings to avoid carrying over some error.
That’s basically all there is to it.
I’m finally settling in, to using Mac OS full time except for when I want to write a blog post or download embedded videos with ease (Internet Download Manager ain’t available for Mac OS). The battery life while working in Mac OS environment is so much better than in Windows 8.1 Pro.
Questions, comments and feedback of any sort are welcome in the comment section. I sincerely hope this Mac OS Recovery Disk creation guide works for you.
Sources:
- OS X Mavericks Clean Install w/ Bootcamp Restore!
- MacRumors Forums – View Single Post – How to make a bootable install of Mavericks on Flash USB Drive?
- Clean Install Mac OS X Mavericks w/ Recovery Partition & Find my Mac Fix
You’ll also like:
- Fix: Apple Mac OS X Yosemite Beta 4 Random Logging Off Issue
- Things to Do Before And When You Get An Apple MacBook Pro
- How To Access Mac OS X Partition Via Bootcamp
- Free Data Recovery Software For MAC OS X & Windows PC
- How To Store Or Transfer Your MacBook Data Onto Another Partition
Please share this article to help others. Thanks